
Swift DocC: Theming and Distribution techniques

Preface
Effective documentation is essential for any software project, enhancing usability and fostering adoption. This article, "Swift DocC: Theming & Distribution techniques" explores how to customize and distribute documentation using Swift DocC, Apple's powerful documentation compiler.
This article will cover some details that can’t be found easily in the Apple Documentation website, and if you encounter some issues when building your own Swift DocC, I hope this article can help you.
Note: This article is based on my open-source project PhotonMetalDisplayCore, and please feel free to check this out.
Get Started on Swift DocC
If you have already written comments in your code, you are already preparing for the Swift DocC. To view the documentation, you can select Product menu → Build Documentation command from Xcode to build and view the documentation.
However, just writing inline comments in your code isn’t good enough for a documentation, as documentations sometimes should include some guides or tutorials. If you are hosting your Swift Packing in GitHub, it’s fine to write your own articles using GitHub’s Wiki or simply put markdown files in some folders. But Swift DocC can help you build a structured documentation, containing all the articles as well as the code-level comments.
To do this, you can select File → New → File from Template in Xcode and search for Documentation Catalog to add a DocC Folder that should be placed under the Target Folder.
For a Swift Package, a target folder is under the Sources folder and contains all your source code for that target.

Something you should know about the DocC:
The landing page of the built documentation is the one that starting with # ``<Your Target Name>``. For my PhotonMetalDisplayCore target, I have a file named PhotonMetalDisplayCore.md, and its first line is # ``PhotonMetalDisplayCore`` .

You can then write other articles for your documentation and organize them in the landing page. To learn more about Swift DocC structure and formatting, please refer to some official documentations.
https://www.swift.org/documentation/docc/formatting-your-documentation-content
https://developer.apple.com/documentation/xcode/writing-symbol-documentation-in-your-source-files
https://developer.apple.com/videos/play/wwdc2023/10244
Theming techniques
Though there is an official documentation about Customizing the Appearance of Your Documentation Pages , and you can customize some parts of the documentation. But there are a few things you should know:
The theming system is used when building as webpages for external share. For example, when you generate documentation via the command line(this will also be described in the below), the theme will be applied.
When viewing documentation via Xcode or the output
*.doccarchivefile, the theme from Xcode will be applied. The theme from Xcode consists across all the documentations published by Apple.
To preview your documentations locally, you can use this command:
swift package --disable-sandbox preview-documentation \
 --target <Your Target Name>
This will start a local server and you can visit your page via some URL like:
http://localhost:8080/documentation/photonmetaldisplaycoreThe differences between the default webpage based theme and the Xcode theme are quite big:
The default icon in the hero area of a page is sharp regarding to its line style.
The heading title styles are simply not bold, making the structure of an article not so outstanding.

While the official Customizing the Appearance of Your Documentation Pages introduces some ways to customize your documentations, here I will uncover some details or techniques I find to help you make your documentations look better.
Light & Dark theming
There is such a description in the Open API specification of themesettings.spec.json:
"Color": {
    "oneOf": [
        {
            "type": "string",
            "description": "Any valid CSS color value."
        },
        {
            "type": "object",
            "description": "A map of light and dark CSS color values to use as appropriate.",
            "required": [
                "dark",
                "light"
            ],
            "properties": {
                "dark": {
                    "type": "string"
                },
                "light": {
                    "type": "string"
                }
            }
        }
    ]
}
That means you can specify the color for both light and dark theme. But what does that mean and how to make it work?
As an example, the following JSON code in the theme-settings.json file changes the link color for both light and dark mode.
{
    "theme": {
        "color": {
            "link": {
                "light": "#983592",
                "dark": "#bcd3ff"
            }
        }
    }
}
You can also use different gradient fills for both light and dark mode:
{
    "theme": {
        "color": {
            "documentation-intro-fill": {
                "light": "linear-gradient(30deg, #DAE4FF, #FECECF)",
                "dark": "linear-gradient(30deg, #526084, #FECECF)"
            }
        }
    }
}
Use SFSymbol icons for your article
As I ware saying, the default icon in the default theme is quite bad, which is sharp around its line.

There is a simple & free way to get much nicer icons for you documentations, and it’s from the SFSymbols app from Apple.
To export a symbol, find and select a symbol and right click to bring up the context menu, then select Copy Image As… command. Then depending on your needs, you can scale the image by setting the scaling size to a larger value, like 400.

Later, you put the exported icon in the Resources folder and set the page’s metadata to use that icon:

To know more about the metadata in a page, please refer to:
https://www.swift.org/documentation/docc/pageimage
Find the right theme settings for an element
Although there is a description of themesettings.spec.json in the Open API specification, it doesn’t provide a clear explanation of the theme settings. For example, I just want to change the background of the Note block, how to find out which theme settings should I touch?
You can just find it using the web inspector in your browser. For example, you can hover your cursor to the Note block and see which color variable it currently uses and change its color accordingly in the theme-settings.json file.

{
    "theme": {
        "color": {
            "aside-note-background": {
                "light": "#f0f0ff",
                "dark": "#000000"
            },
            "aside-note-border": "#696999"
        }
    }
}
However, some elements just can’t be customized in the current implementation of theme settings. For example, I think the font weight of the heading is too small and there is no way to change it. I suppose we change it after the generation of the documentation, like changing the output css files. But I haven’t try this method yet.
Distribution
Documentations are for people to read. To distribute documentations to your team or the external users, there are a few methods:
Export it directly via Xcode after building the documentation in Xcode. This exported
*.doccarchivefile can be opened directly in Xcode and will have good theming. Despite its convenience for the publisher, it’s hard to maintain and for non-Mac users it’s not viewable.
Export it as static webpages and deploy it in your server or as GitHub pages.
Export via Xcode
Exporting documentation via Xcode is a straightforward process. After successfully building the documentation, locate your target and click the Export command, as illustrated in the image below.

The exported file is ending with doccarchived , and it can be opened by Xcode.
Note: it’s still a folder though, and you can use the “Show Package Contents” command in Finder to view its content. The content inside is like a static webpage, but hosting this to your server or GitHub pages may fail since you can’t specify the
hosting-base-pathparameter when building inside Xcode.Another important note: though the output static webpages contain a index.html file, if you try to open the index.html it will be complete empty. That’s because it’s a web app, and it needs some environment to render content. To preview the website locally, you should use Xcode build or this command.
Use command line to build
There are two ways to build Swift DocC as static webpages: using Swift DocC plugin and using XcodeBuild command line.
After building the documentations, you can host in your server or GitHub pages. For GitHub pages, before pushing your code with built docs, you should configure the page settings properly:
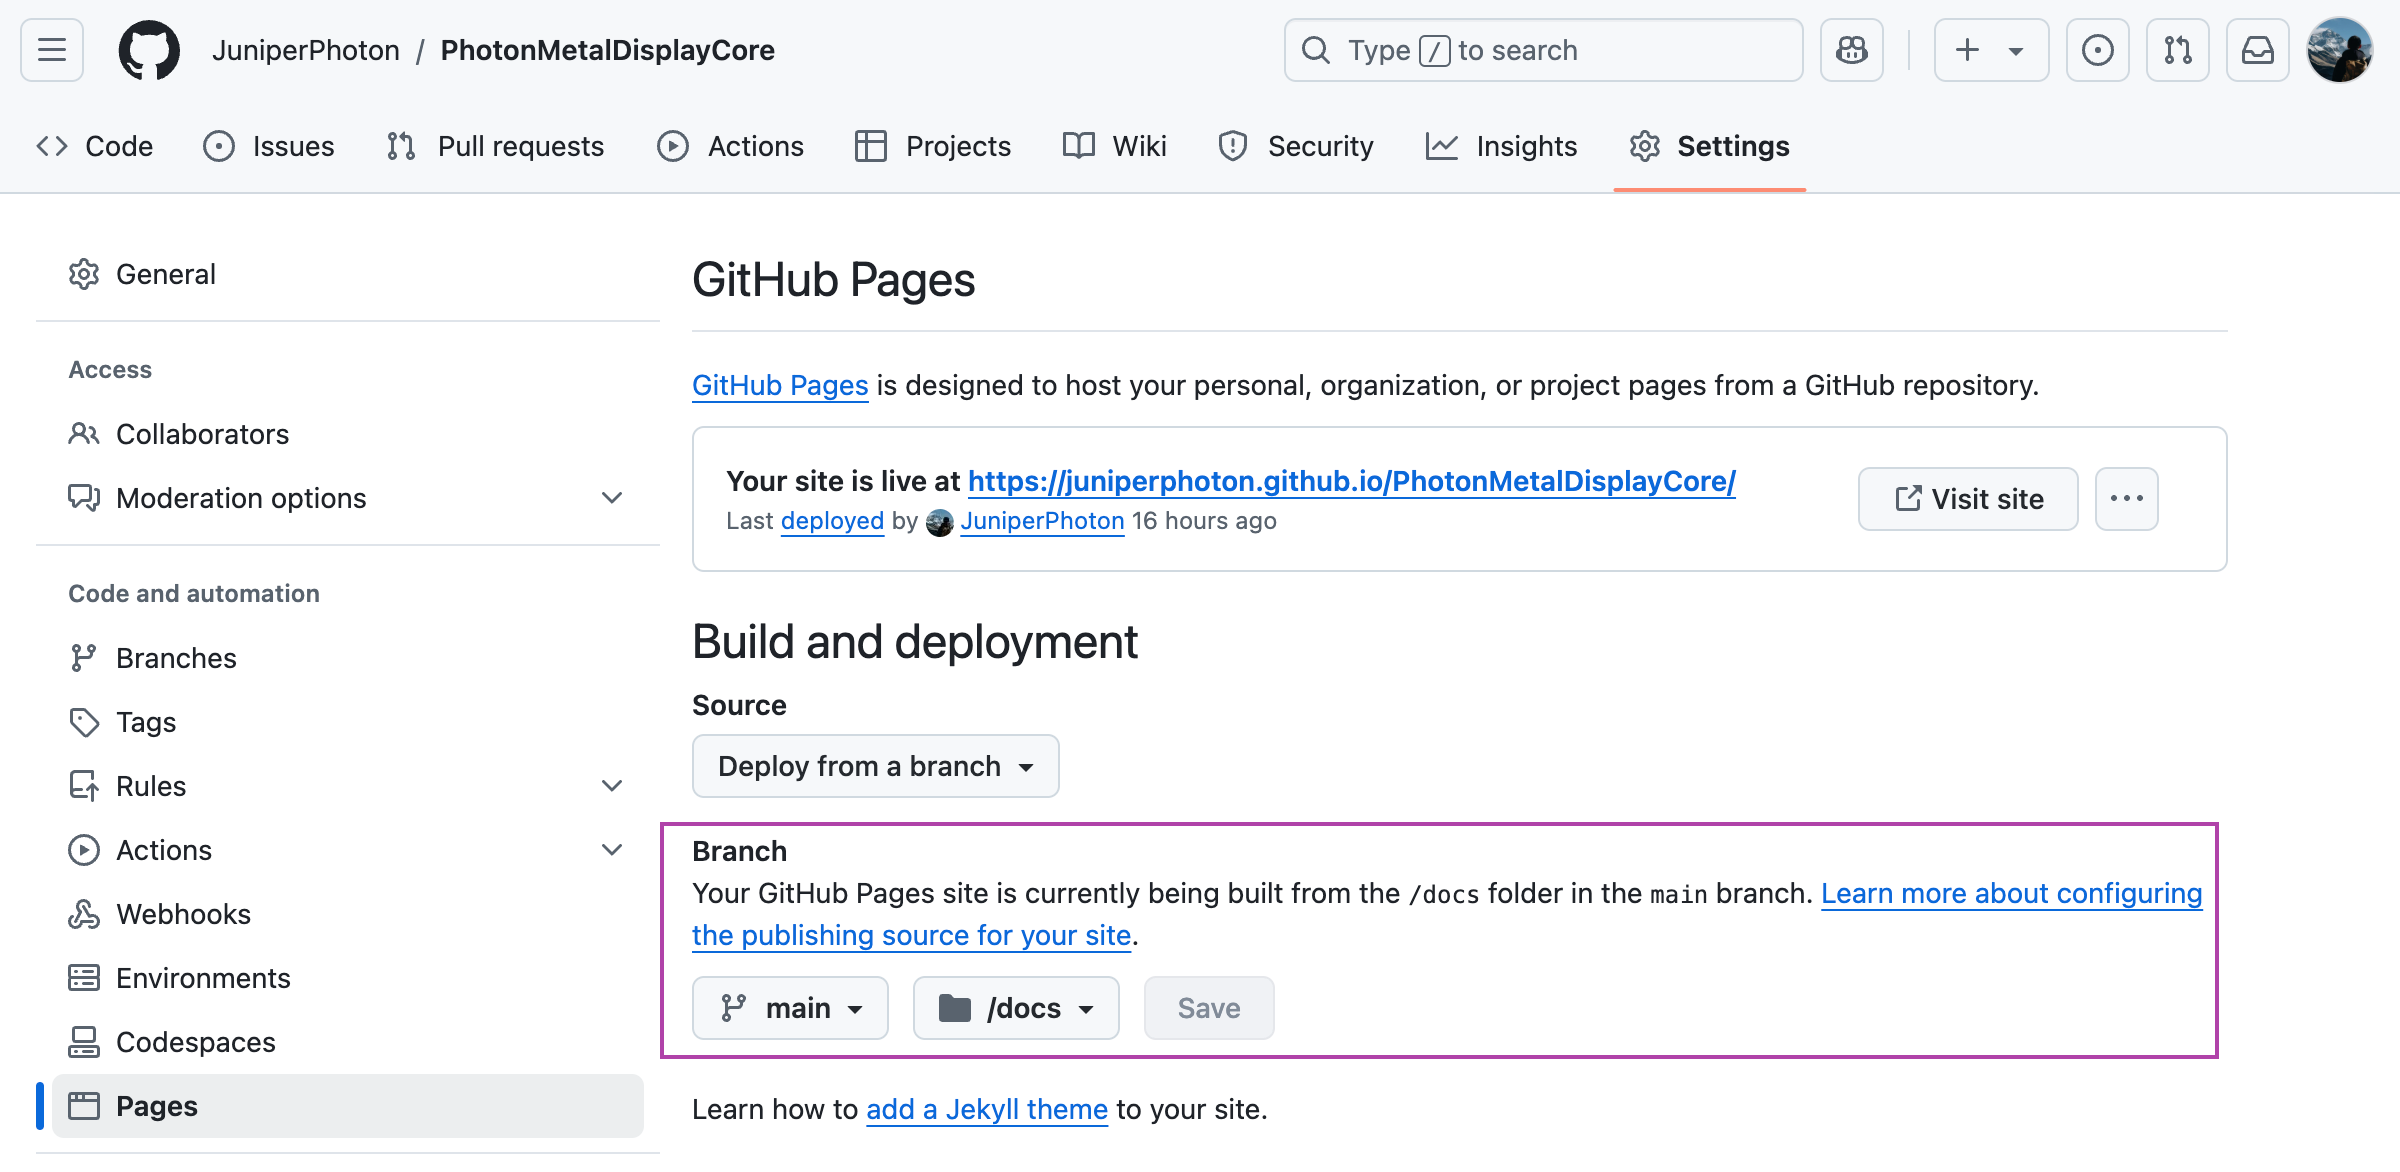
You can find more details here:
Use Swift DocC plugin to build
To use the Swift DocC plugin, please first make sure your Swift Package has added the dependency to it:
dependencies: [
    .package(url: "https://github.com/apple/swift-docc-plugin", from: "1.4.3")
],
Then you can use the following command to build:
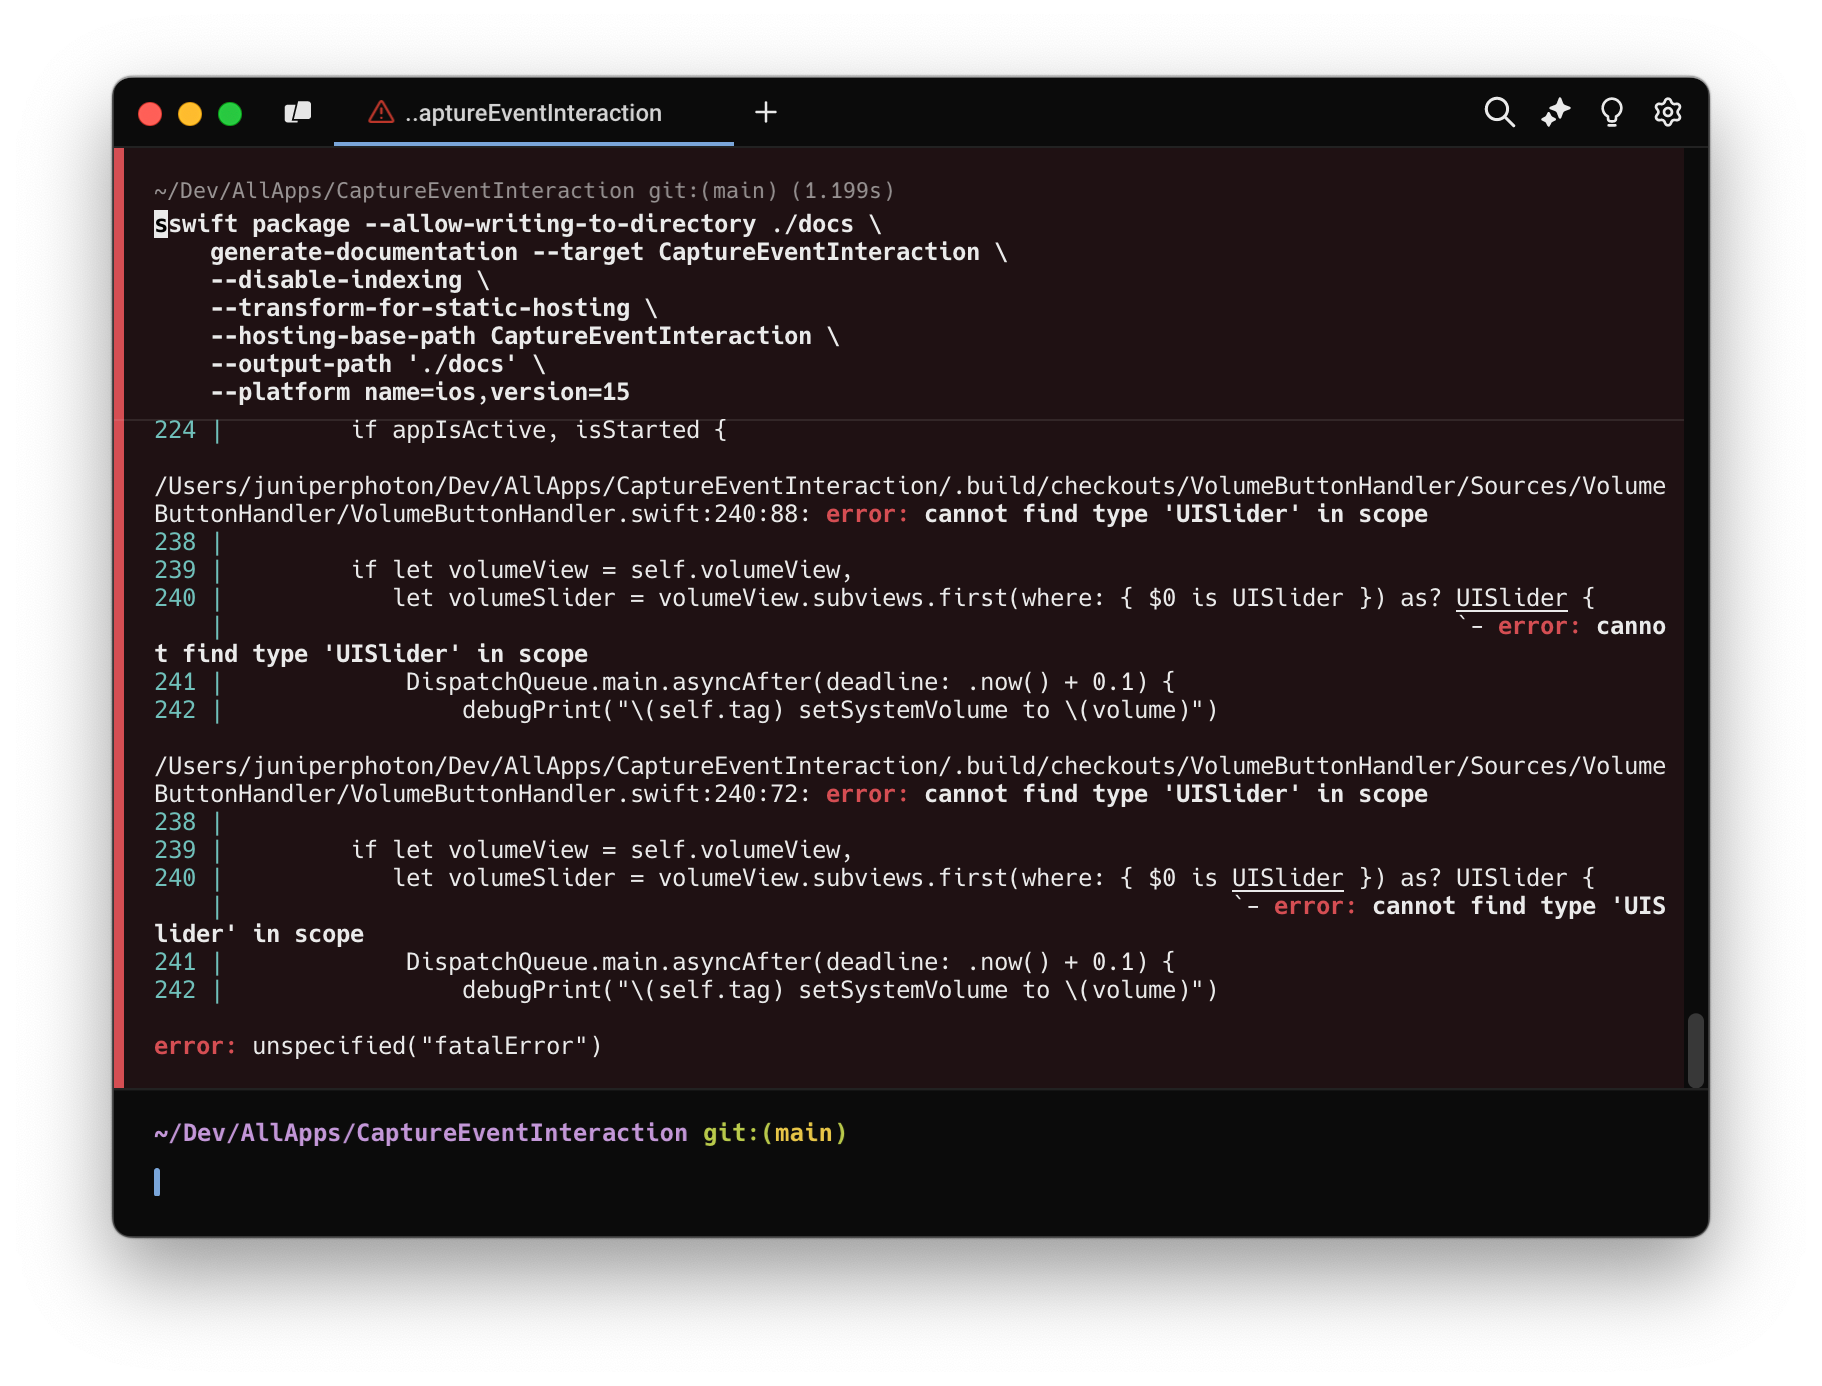
swift package --allow-writing-to-directory ./docs \
    generate-documentation --target <Your Target Name> \
    --disable-indexing \
    --transform-for-static-hosting \
    --hosting-base-path <Your Target Name> \
    --output-path './docs'
The command:
Build the documentation of <Your Target Name> and output it in the
./docsdir.
Note about the --hosting-base-path parameter. According to the documentation:
The base path, if any, your website will be hosted at. Most likely this will be the name of your GitHub repository.
It specifies the base path of your hosting destination. For a GitHub page, it should be the name of your repository. And the URL to visit your documentation will have the following format:
https://<Name>.github.io/PhotonMetalDisplayCore/documentation/photonmetaldisplaycore
                        ╰──────────┬──────────╯
                         your custom base path
Your custom base path will follow the documentation and the target name, all in lowercase. If you don’t type your target name in the lowercase, the URL is wrong.
Use XcodeBuild to build
There is a downside when building documentations using Swift DocC plugin, as it only supports building for macOS platform. There is a parameter named —platform . According to its description, it should do the trick and just build the iOS platform. Unfortunately, it won’t work.

Build for macOS platform means that if your Swift Package contains code or frameworks that are from UIKit, it will just fail to build.
To avoid this issue, we need to switch to use XcodeBuild to build our documentations.
xcodebuild docbuild -scheme <Your Scheme Name> \
	-derivedDataPath ./.build/derived-data \
	-destination 'generic/platform=iOS' \
	DOCC_HOSTING_BASE_PATH='PhotonMetalDisplayCore'
The command above uses xcodebuild to build documentations:
The output
*.docarchivecan be found in the specifiedderivedDataPath.
You can specify the scheme to use. A build scheme in Xcode is a configuration that defines how an application is built, tested, and run. Normally a debug scheme is good enough for documentation building.
You can set the destination to
generic/platform=iOSto build for iOS platform only. This can avoid the issue mentioned above.
After the successfully built the documentation, you can find the *.docarchive in the derivedDataPath you have specified. If your Swift Package contains multiply targets, all targets will be built and will have multiply *.docarchive. You can find your target *.docarchive to publish via the find command and rename it to docs, which matches the page settings in GitHub.
To make it more convenient, you can put the following commands into a *.sh file and run it.
# Run the xcodebuild command
xcodebuild docbuild -scheme <Your Scheme Name> \
    -derivedDataPath ./.build/derived-data \
    -destination 'generic/platform=iOS' \
    DOCC_HOSTING_BASE_PATH='<Your GitHub Repo>'

# Check if the command was successful
if [ $? -eq 0 ]; then
    # Find and copy the .doccarchive to the current directory, renaming it to 'docs'
    find ./.build/derived-data -type d -name '<Your Target Name>.doccarchive' -exec cp -R {} ./docs \;
else
    echo "xcodebuild command failed."
fi
Note: please remember to replace the placeholder texts to match your case.
Some other useful links when exploring Swift DocC and finding solutions are:
https://github.com/swiftlang/swift-package-manager/issues/5555
https://developer.apple.com/documentation/xcode/distributing-documentation-to-other-developers