


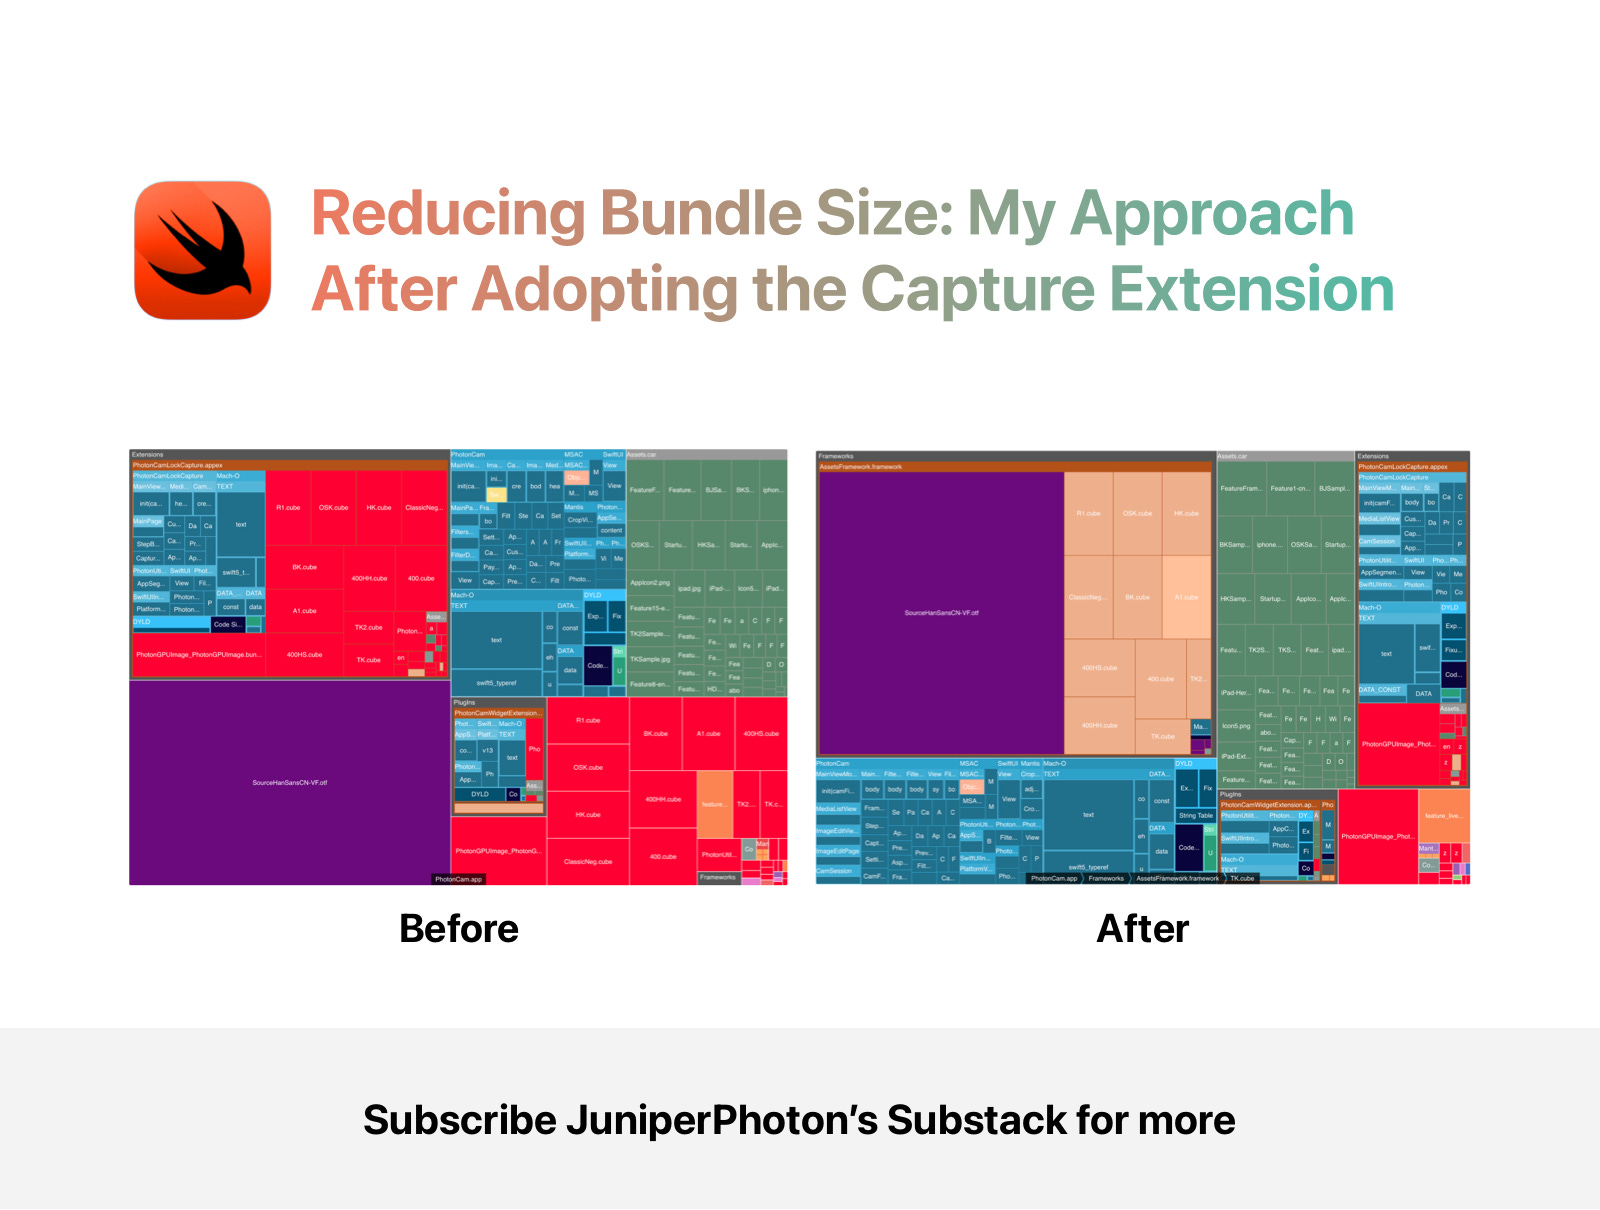
Reducing Bundle Size: My Approach After Adopting the Capture Extension

Background
I recently adopted the new Locked Camera feature, introduced in iOS 18 with the LockedCameraCapture framework. To integrate this feature into your app, you need to create a new iOS Capture Extension alongside your main app. The extension will be launched when users press and hold the Control on the Lock Screen or via the Action Button.
An extension is a target in Xcode. In iOS, extensions serve as mini-entry points across the system. When users tap the app icon on the Home Screen, iOS launches your main app target. When users tap to share content, such as photos, iOS launches your share extension if applicable. Extensions can share code, assets, or resources with the main target: you can simply find the target membership panel in Xcode and click the checkbox.
By clicking the checkbox in Xcode, the current files will be compiled for the specific targets, and the resource files will be copied into the specific targets’ bundle. The term “sharing” mentioned above simply means that you don’t have to rewrite your code to accommodate the new targets; you just tell the compiler that you want those files to be compiled or copied when compiling the targets.
This approach can lead to an issue: the final bundle of your app will be nearly twice the size if you compile and copy all the files and resources to both the main target and your Capture Extension. The main reason is that the compiled code is statically linked against each target. You may notice that the term I used is “statically,” and the solution to this issue is obvious: do it dynamically.
The following content is about how to analyze the content of your archived bundle based on my PhotonCam and how to significantly reduce the bundle size.
The architecture of PhotonCam
Solving a problem has many aspects of solutions based on the current architecture of your app. While the general solution for sharing compiled code and resources is using Dynamic Frameworks, the choice of which files or resources to link dynamically should vary based on the architecture of your app.
PhotonCam started as an indie app, designed, programmed, tested, and promoted solely by myself. Despite the many additional features like Filters, Frames, and Aspect Ratio customizations, as well as photo editing, it remains a camera app offering pro-level camera functionalities. It has a flat architecture: all business code is organized in an Xcode folder, and some common and sharable code is separated into dedicated Swift Packages hosted on GitHub. The resources of the app include JSON files that describe the built-in filters, assets that are used as images in the UI, CUBE files that implement some filters, and OTF or TTF fonts used in the Date Stamp and Frame features.
Below is an image illustrating the architecture of PhotonCam:

To adopt the new Locked Camera feature, I create a new Capture Extension and mark almost all the Swift files, assets and resources to the new target. With a few tweak in Swift code, like using preprocessor macros, the app equipped with full features is available in the new Capture Extension. However, after uploading to the TestFlight, I notice that there is a significant size bump compared to the previous version. It’s almost twice larger than the previous one. Given the fact that files are compiled per target and resources are copied to the selected targets, the result seems fair.
But are there any ways to improve the app bundle size? Of course, but I will introduce a new tool named Emerge Tool to analyze the archived bundle size.
Use Emerge Tool to analyze
Emerge Tool is a platform that helps developers gain insights into their archived bundles, as well as perform some performance analysis. It offers a 14-day trial, which is more than enough for analyzing such a specific problem.
After uploading the app bundle in ZIP format, you can find the Size Analysis in the sidebar. Here is the analysis result of the PhotonCam app after first adding the new Capture Extension.
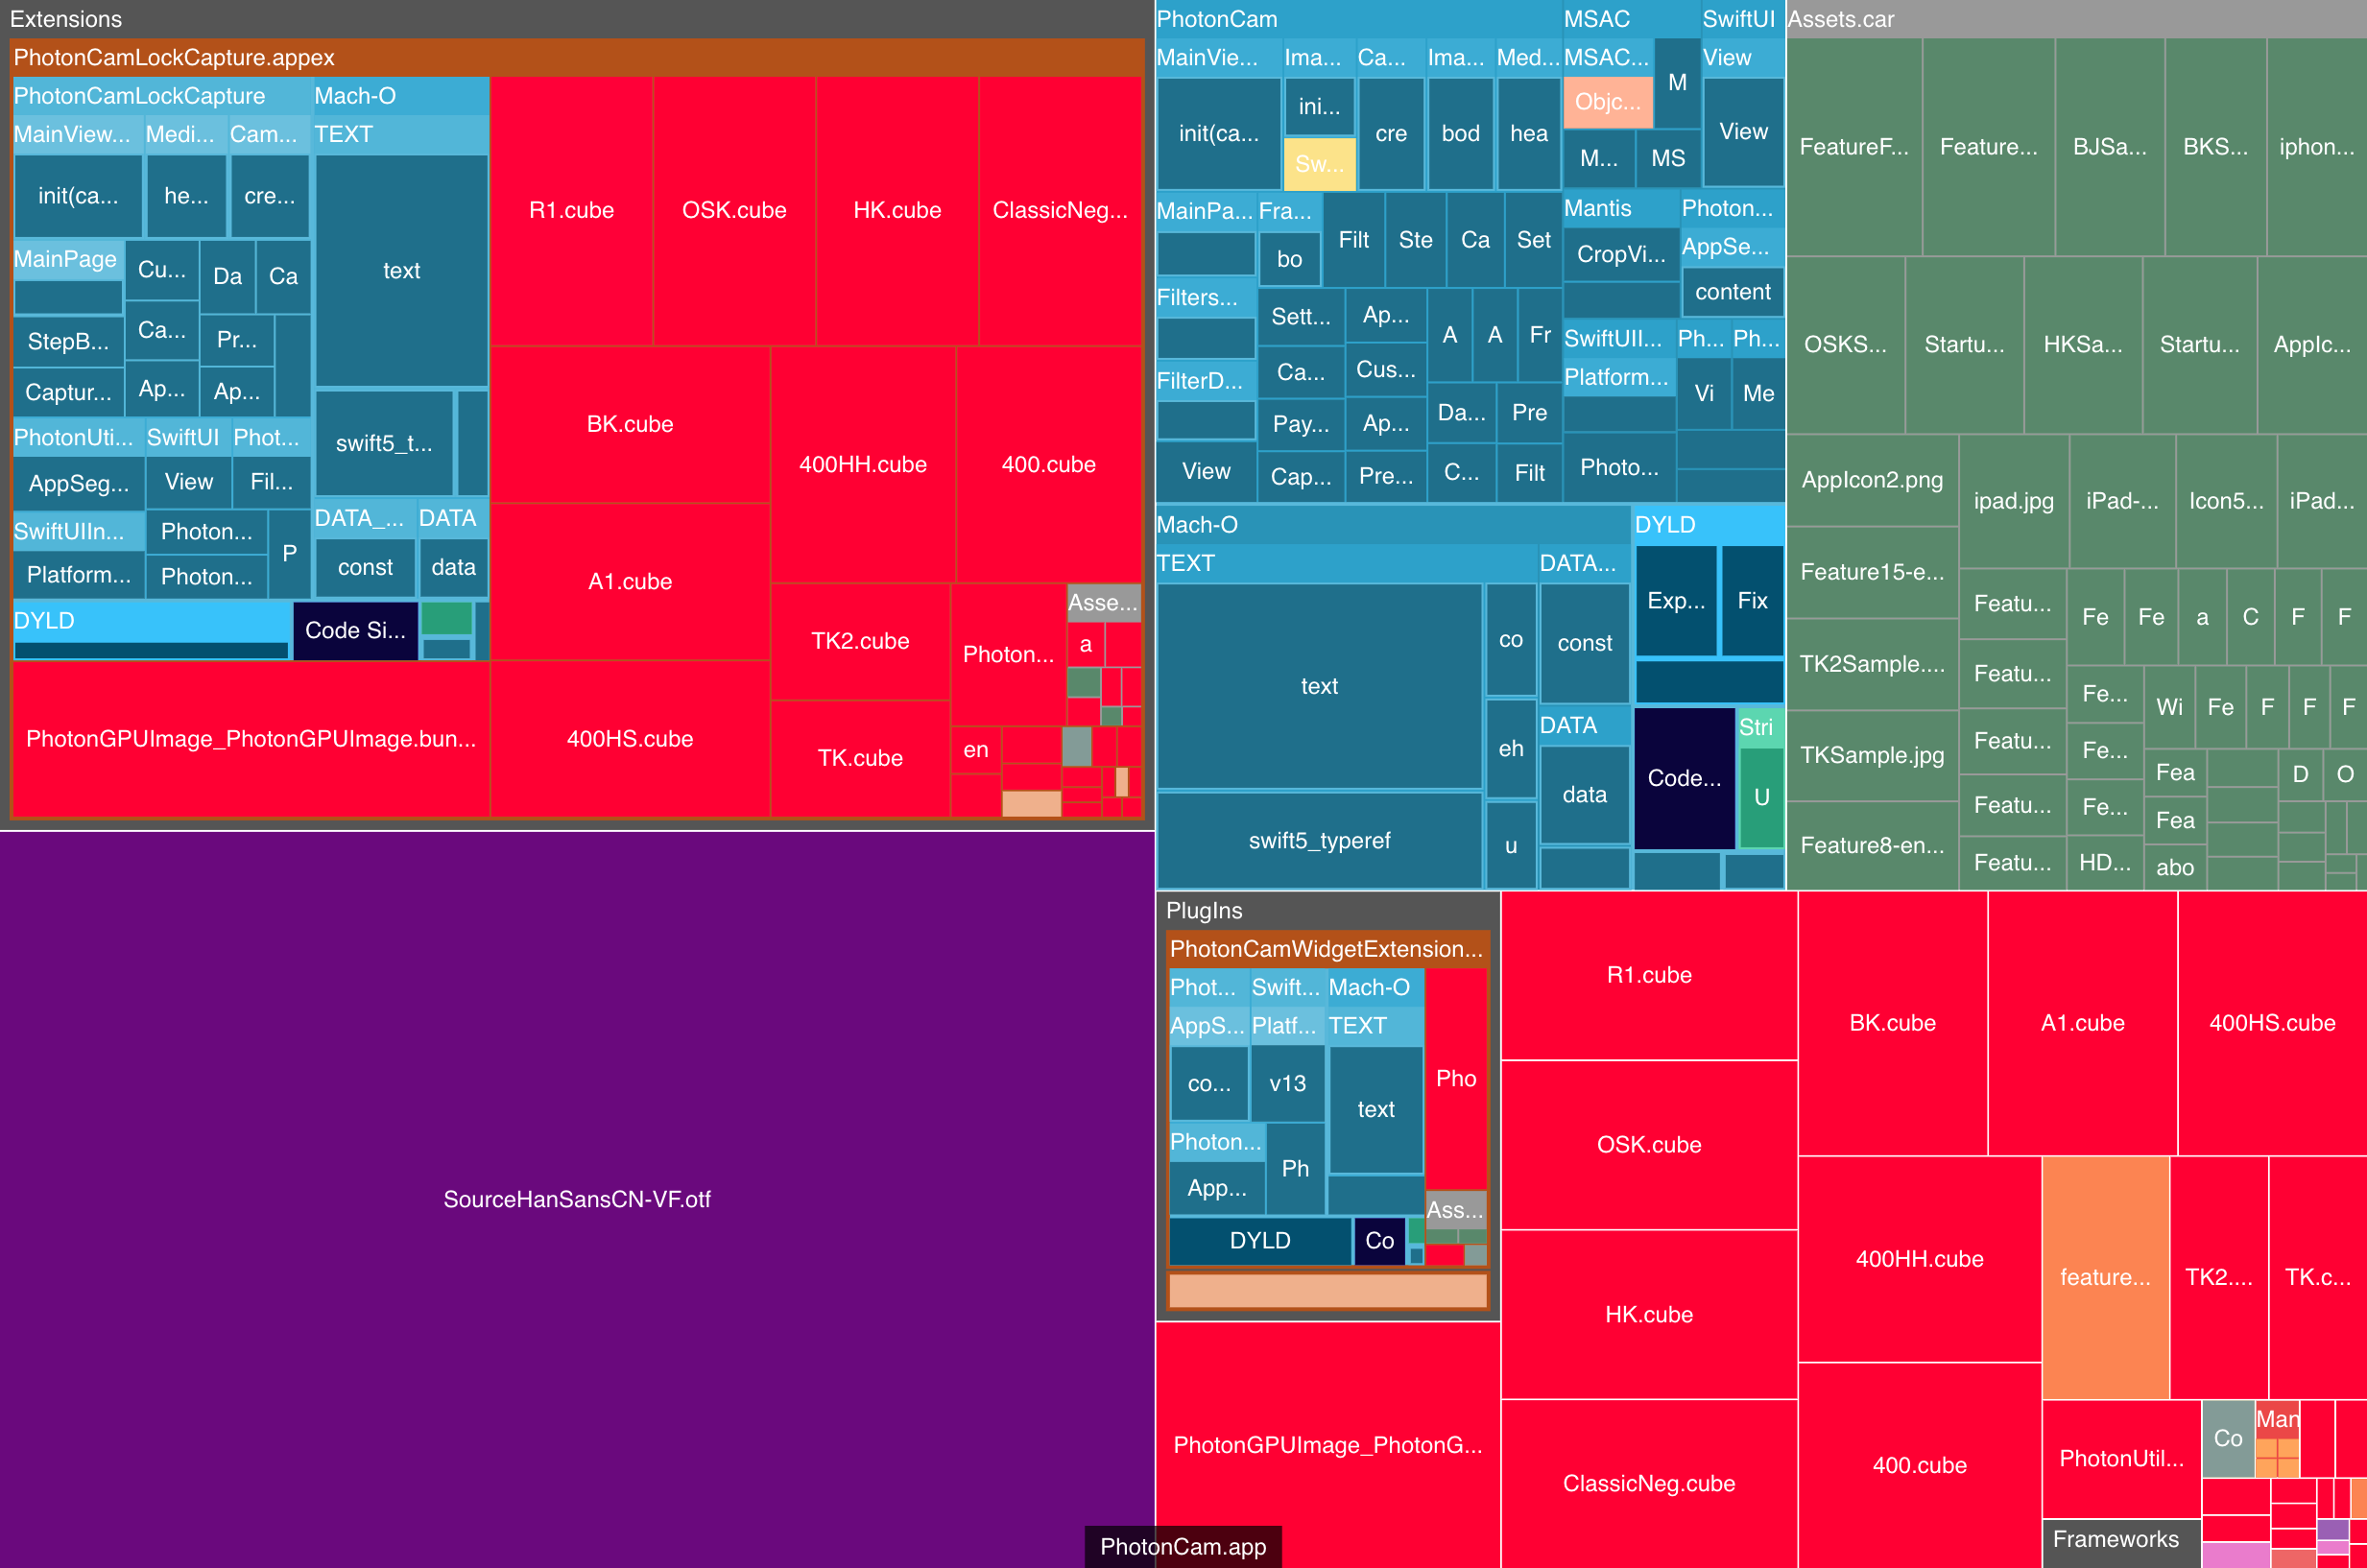
Here are some key points in analyzing this graph:
The size of each grid reflects the differences in file sizes. The larger the grid, the larger the actual file.
The grids marked with a red background represent the duplicated parts of the archived bundle, which should be the focus for elimination.
The whole graph is categorized by the types of files in the archived bundle. These types include the main target, the compiled assets, the extensions, and the plugins.
Here we can easily see that the largest file in the archived bundle is the SourceHanSansCN-VF.otf file, which is a font file used in the Frame feature. As mentioned above, some filters use CUBE files for implementation, and these CUBE files are duplicated across the main app and the Capture Extension.
We can remove the duplication of these files by placing them in a Framework and linking it dynamically.
Dynamically Linking
When it comes to dynamic linking, there are two options: one is the Swift Package introduced in recent years, and the other is the Framework, which dates back to much earlier.
You might think that both methods can do the job. However, that’s not true. Let me explain.
Using Swift Package
To include resources in a Swift Package, here’s how you can do it:
Create a new Swift Package in Xcode: File → New → Package, and select the Library type.
Save the Package inside the folder of your project.
In the Package Dependencies tab in Xcode, add the new Swift Package as a local package.
Drag the package folder from Finder to the root of the project to enable source code editing.
Create a new folder inside the Swift Package’s Sources folder, place the resources in it, and ensure the resources are actually moved into the new folder and not just referenced by the original targets.
Expose Bundle.module for the main app to retrieve the URLs for the resources.

The Package.swift of the new Package would look like this:
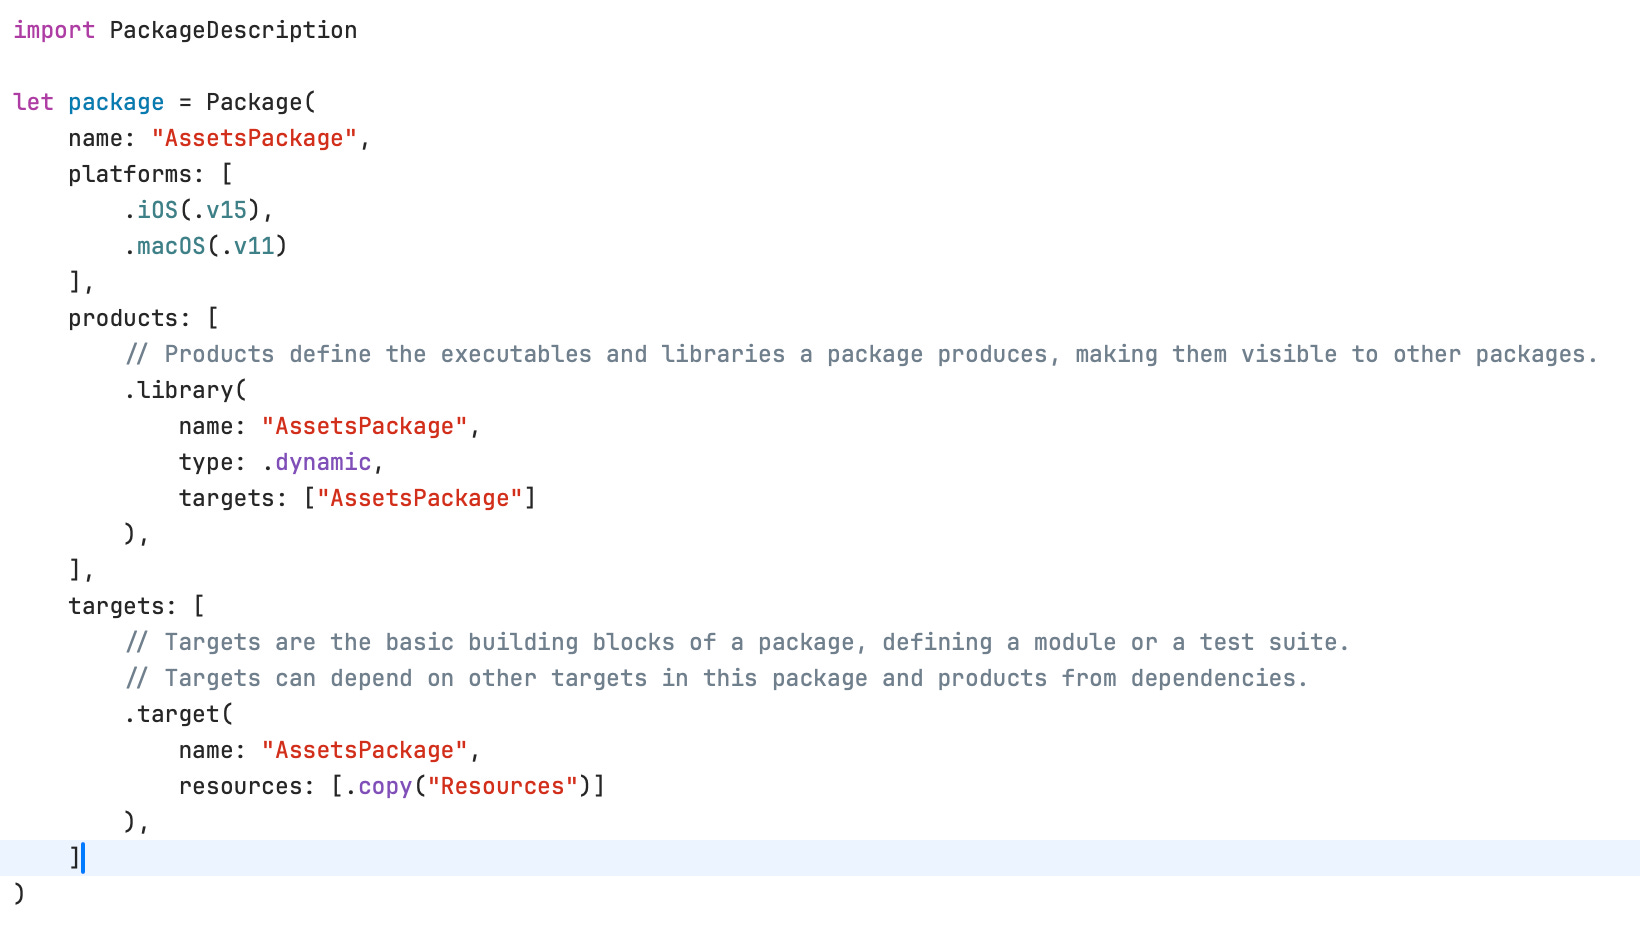
Note that the difference between copying resources and processing resources is that copying the resources will preserve the original hierarchy of the files. For example, you would need to specify the subdirectory parameter when accessing files inside the Fonts folder. In contrast, processing resources will result in a flat hierarchy where all resources will be in the same root directory.
Declaring the product type as dynamic allows us to choose whether to embed the Swift Package per target.
In Xcode, for the main target, we set the new Package to be embedded and signed, while for the Capture Extension, we set it to not be embedded.


If you try to run the app at this point, it will work well in both the main app and the Capture Extension.
However, after archiving the package, you may find that the size of the archived bundle remains unchanged. By analyzing the archived bundle using the Emerge Tool, you can see that the Swift Package bundle is still duplicated across the Capture Extension and the main app.

It seems that linking the Swift Package dynamically won’t solve the issue, as all resources will still be copied into the specific targets. I have tried several approaches, such as modifying the Resources creation in Package.swift, but it doesn’t seem to work.
Note: To reference the Bundle class of the Swift Package, you need to expose the
Bundle.moduleclass in the package. For example, you can add a property as an extension and returnBundle.module.
Using Dynamic Framework
Since the Swift Package approach won’t work, I turned to using the Framework and linking it dynamically.
To implement this approach, you need to:
Create a new Framework target.
Add the resources to the target.
Expose the Bundle instance of the framework using
Bundle(identifier:)so the main app can retrieve the URLs for the resources.

Then configure the main target and the Capture Extension to link to this framework dynamically.
Finally, build and archive the app to see what happens.

By checking the archived file size, you may notice that the size of the bundle has been drastically reduced. Let’s dive into the bundle using the Emerge Tool.

As you can see, the red parts of the archived bundle have been reduced to a few small items, including some localization files and one large PhotonGPUImage bundle. The PhotonGPUImage bundle mainly consists of a Swift Package containing Swift code and a large image used as the overlay for the grain filter, which could be replaced entirely with an algorithm-based method. Additionally, the localization files are relatively small because PhotonCam currently supports only three languages. Large brands might have apps with 60+ localizations, which would significantly increase the size of the archived bundle. I will address this optimization in the future.
Ultimately, I should modularize the app by separating it into different business modules and keeping the main entry point as minimal as possible. This approach allows us to determine which modules should be included in each specific target. For example, Swift code related to the settings page should be compiled into the Capture Extension if it’s not in use. However, the duplicated codebase constitutes only a small portion of the archived bundle, so I will leave that unchanged for now. The key point is to tailor the solution based on your project’s scale.
Potential drawback
Using a Dynamic Framework is a kind of trade-off, as it will introduce a longer launch time while reducing the bundle size. As the blog from Emerge Tool states:
In the pre-main phase of app launch, dyld links the necessary frameworks to the target, ensuring all executable code and assets are accessible.
I have tested the app and the Capture Extension, and no noticeable launch lag was found. It’s recommended that you consider the trade-off before adopting this solution.
Thanks for reading!
Useful links
https://www.emergetools.com/blog/posts/make-your-ios-app-smaller-with-dynamic-frameworks