
Pro to SwiftUI: Menu touch through issue and solution


Update on iOS 18
Apple has finally fixed this issue on iOS 18:
Fixed: SwiftUI gestures no longer errantly trigger when dismissing a menu.
So this workaround can only be applied to the versions prior to the iOS 18, and you can use if #unavailable(iOS 18) to perform logic prior to iOS 18.
Background and Problem
In SwiftUI, we use Picker or Menu to implement a selector or a dropdown menu, which are essentially the same thing, just with some differences in UI details (hence, this article will only use Menu to refer to them). They are not pure SwiftUI Views like Text, but SwiftUI Views bridged to UIKit and AppKit. Specifically:
On UIKit, it is equivalent to using
UIButton+UIMenu
On AppKit, it is equivalent to
NSPopUpButton
The usage is very simple:

The customization options for using Menu on SwiftUI are quite limited. This is largely due to the fact that SwiftUI doesn't expose many properties for customization. However, if you can access the underlying UIView/NSView through the Introspect library, you can then freely manipulate it - although there should be considerations for "unified design".
But even on macOS, you can't change the color of a label in its non-expanded state through any related methods on the SwiftUI layer, which is something I'd like to take this opportunity to complain about.

So, what are the usage issues with this Menu?
At first glance, there doesn't seem to be any problem. Clicking on the Menu's Label displays a dropdown style menu, and clicking on the buttons inside can trigger events, which is fine. But what if there are other Buttons on this page? And these buttons are not blocked by this dropdown style menu, can they be clicked?
Different answers exist for different scenarios:
On iOS, if the page has a SwiftUI Button, then this button can be clicked when the Menu is expanded; to be precise, the
onTapGesturein SwiftUI can be responded to.
On iOS, if the page has a
UIButtonbridged from UIKit, then this button cannot be clicked when the Menu is expanded.
On macOS, this problem does not exist.
Therefore, if you have such a complex page:

In addition to the menu, there is also a clickable list. Unless the user can click on the button under the dropdown in the Menu and the Label of the Menu itself, there is a high probability that the user may click on the items in the list and then navigate to a new page.
Analysis
First, we need to know what exactly happens in UIKit when we click on the Menu's Label and the dropdown menu appears.
We can use Xcode's Debug View Hierarchy feature to view the current layout.
For the following SwiftUI code:

After running, the corresponding View Hierarchy in the initial state is as follows.
The entire SwiftUI View is managed by a HostingViewController, and this ViewController is managed by UIWindow. If you look further, you will find that the bottom Button does not correspond to UIButton - SwiftUI's Button on iOS is completely self-drawn, no longer bridging from UIKit, which is also the expected behavior.
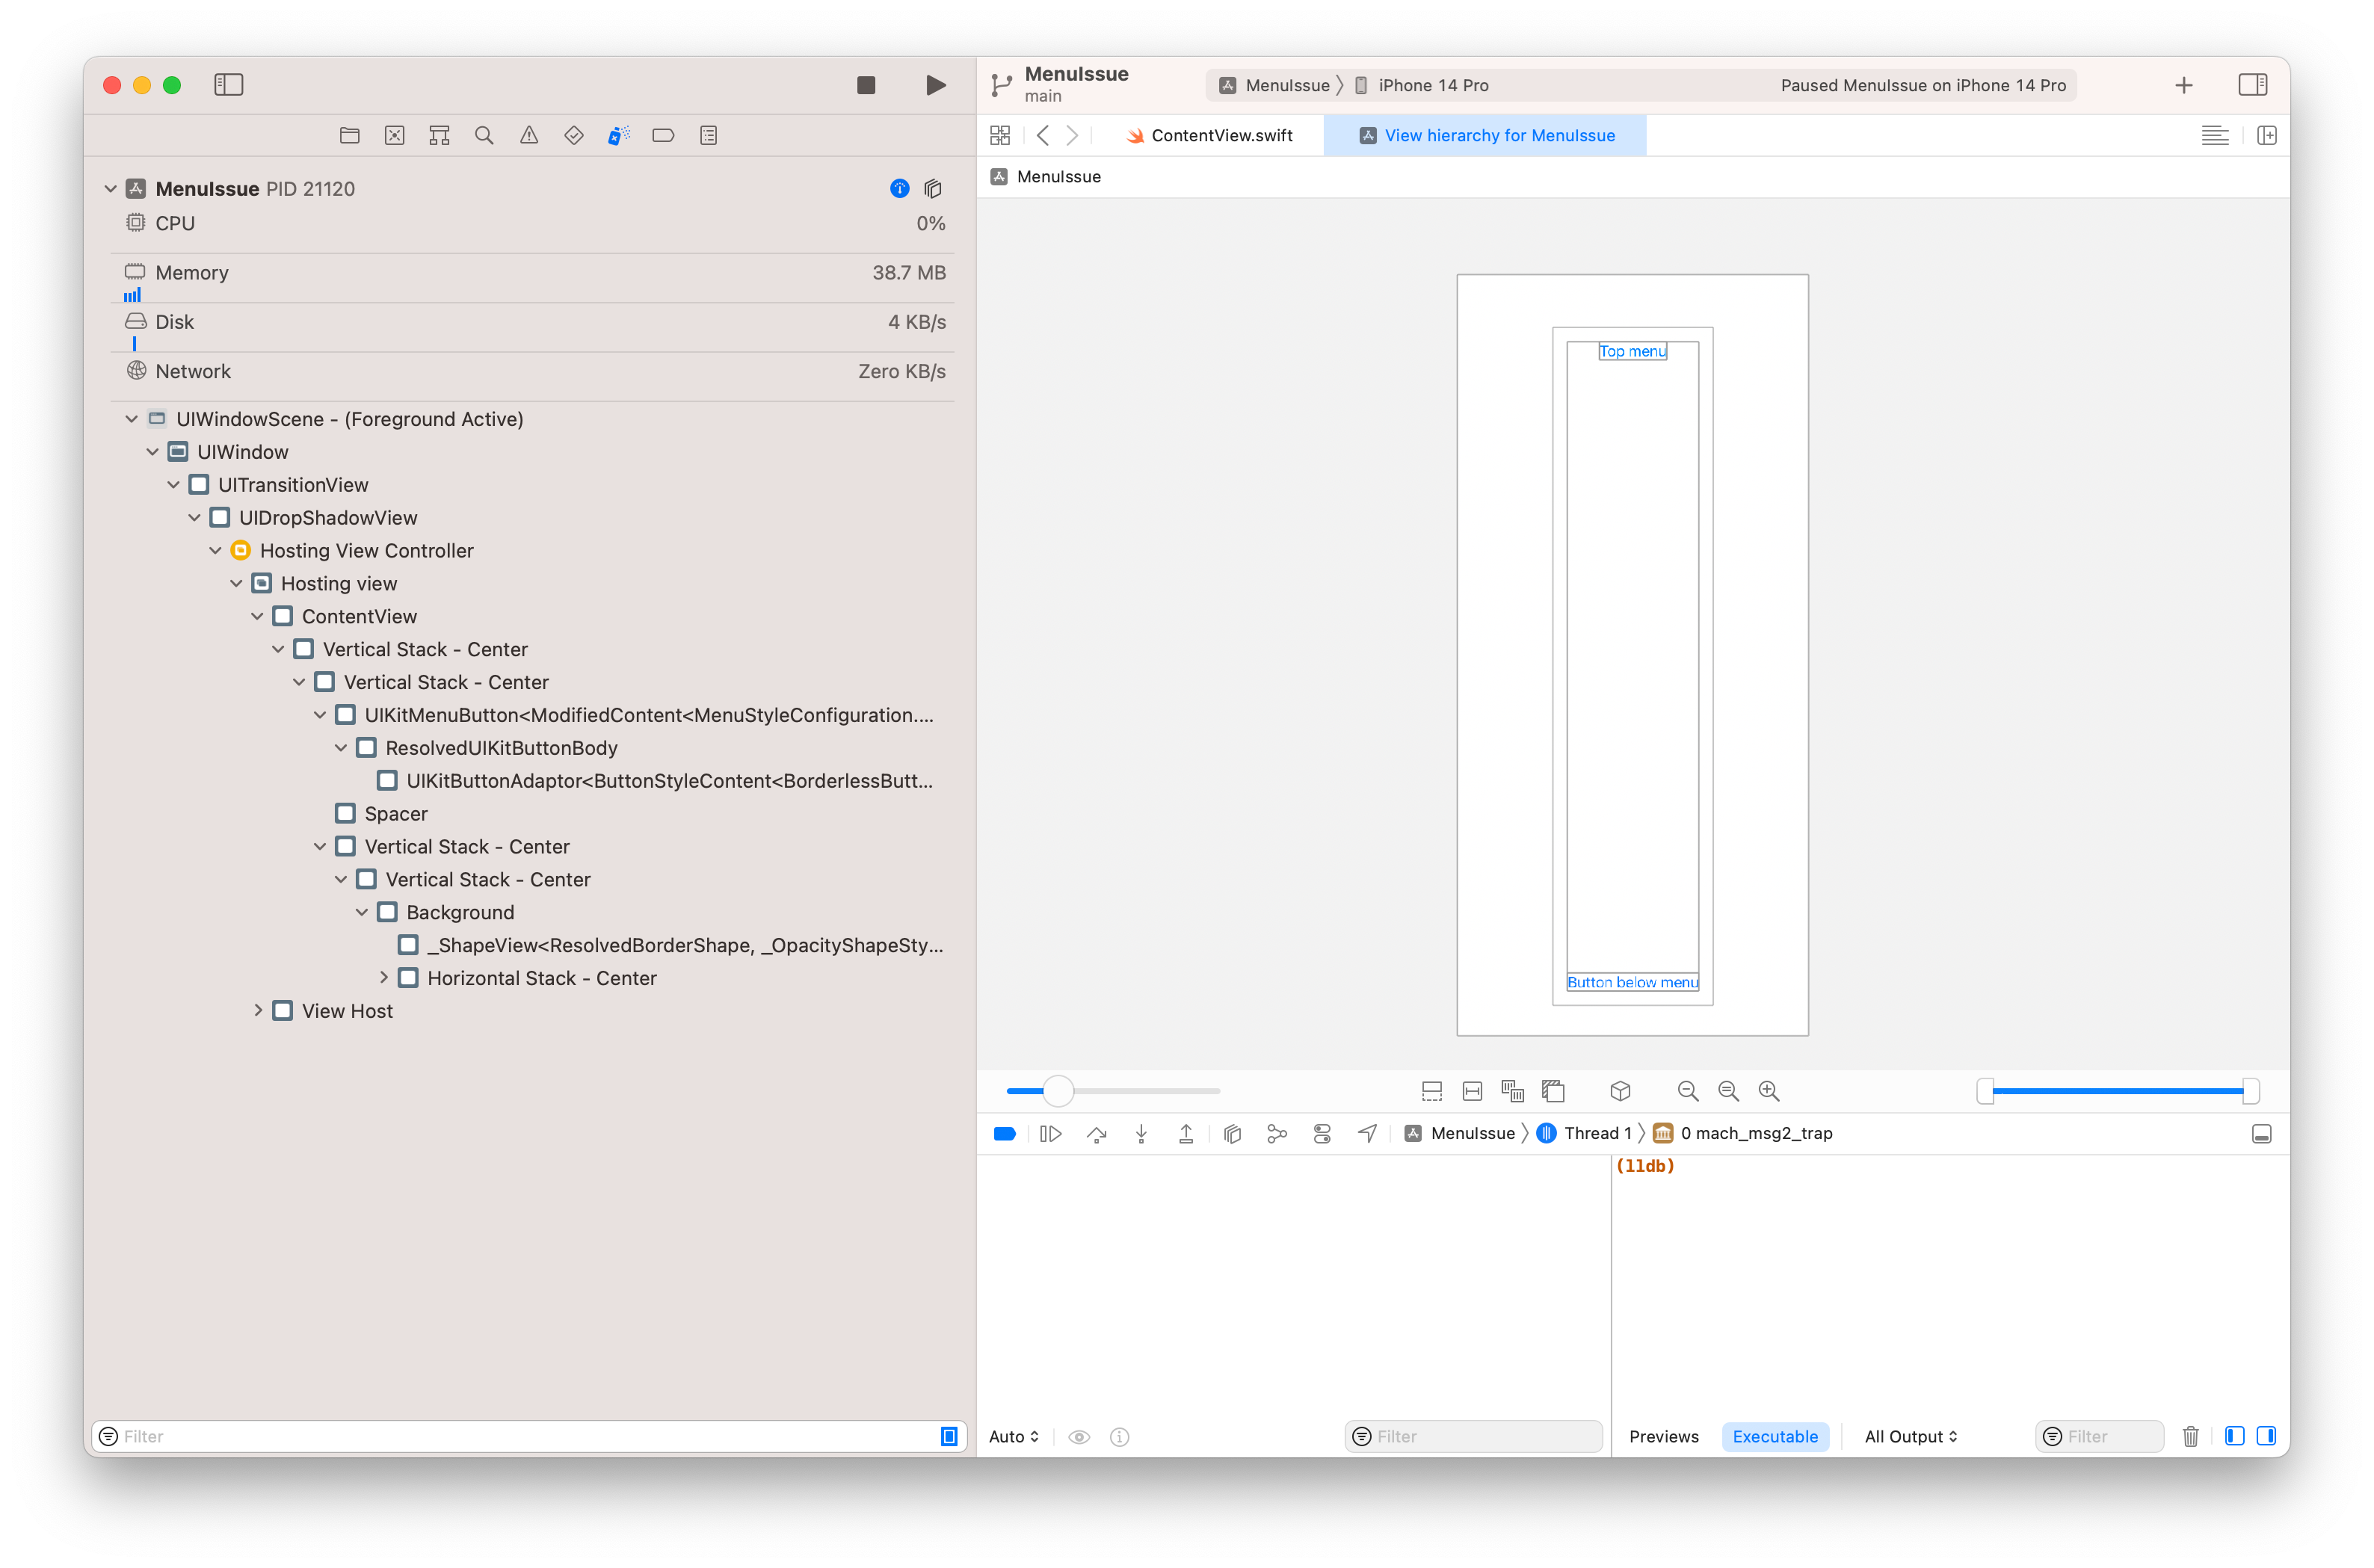
The View Hierarchy appears as follows after clicking the Menu to display the dropdown menu. As you can see, there are several more subviews under UIWindow (even an extra UIWindow, but this is not the focus, we will not explore this here), the topmost of which is called _UIContextMenuContainerView, a private class within UIKit. The dropdown buttons are all indirect sub-views of this _UIContextMenuContainerView, and the button list itself uses UICollectionView + UIStackView for layout.

Judging from the performance, it can be guessed that _UIContextMenuContainerView will not directly respond to touch events. After experimenting, when the dropdown menu appears, by clicking on the area behind the menu (regardless of whether the SwiftUI Button or UIKit UIButton is clicked below), the following things will happen:
The
hitTestofUIWindowwill call and correctly return the clickedUIView
If the SwiftUI Button (or any View with TapGesture) is clicked, it will respond and consume the click event, and will not pass it to the next UIResponder. If the UIKit UIButton (or any UIView with gesture recognition) is clicked, there will be no follow-up after the hitTest call - by observing the UIView returned by hitTest, its next, isUserInteractionEnabled and other properties are all fine.
Here I guess that in the event distribution after hitTest, for the situation where _UIContextMenuContainerView has already appeared, UIWindow or UIView's internal logic has been processed; although the end of SwiftUI View must also be a UIView (for Text and Button, it is a UIView with a name containing CGDrawingView, such as _TtCOCV7SwiftUI11DisplayList11ViewUpdater8Platform13CGDrawingView), but it should not use UIGestureRecognizer in gesture recognition and processing, so it does not cover some original situations on UIView.
Solution
After understanding what the problem is, we can think about possible solutions, which include:
In SwiftUI, separately handle the Menu click and MenuItem click: After clicking the Menu, use a full-screen Swift View that consumes gestures to cover the original View. The Menu container
_UIContextMenuContainerViewwill always load as the last subview ofUIWindow, so it won't be covered by this View. After clicking MenuItem or the full-screen cover View, make this full-screen cover View disappear.Pros: Can be implemented directly in SwiftUI
Cons: The handling of Menu click and MenuItem click needs to be integrated into every usage place; because only clicks can be handled, other situations that can make the Menu disappear cannot be covered (such as putting the App in the background and then coming back)
Monitor the subview changes of
UIWindow, after knowing that_UIContextMenuContainerViewis added, make other child UIViews ofUIWindowunable to respond to interactions (isUserInteractionEnabledcan be set to false).Pros: The most thorough solution, can completely solve this Bug, and does not invade the original SwiftUI layout code
Cons: Need to invade the App's startup, need to inherit
UIWindow, and check the private class_UIContextMenuContainerView; the originalScenePhase,onOpenURLand other methods need to be manually handled.
Since the first solution is not thorough in solving the Bug itself, we will not discuss this solution next, and will focus on the implementation of the second solution.
To implement the second solution, we need to:
Implement a class, inherit
UIWindow, and indidAddSubviewandwillRemoveSubview, determine whether the added and removed child UIView is_UIContextMenuContainerView. If so, set theisUserInteractionEnabledof other child UIViews of UIWindow to false; it is worth noting that: because thesubviewsproperty ofUIWindowis not KVO-Compliant, we cannot monitor its changes through KVO, so there is no need to inherit UIWindow.
Because we need to use our own
UIWindowinstance, we need to construct thisUIWindowat the appropriate time inUIWindowSceneDelegate, and put the original SwiftUI View in it to display; here we need to give up the original SwiftUIApp Protocolusage, because once used, the internal will automatically create UIWindow at startup.
Because we are implementing
UIWindowSceneDelegateourselves, the originalScenePhaseEnvironmentValuewill no longer be distributed, and we need to manually distribute and process it.
The following is the specific implementation.
Inherit UIWindow
Firstly, define a subclass of UIWindow, and override the implementations of didAddSubview and willRemoveSubview:

In the implementation of didAddSubview and willRemoveSubview, we check whether the current subview's class name is _UIContextMenuContainerView. Because this is an internal class, we cannot use _UIContextMenuContainerView.self to get its Type, we need to use NSClassFromString.
For other handling of UIWindow, we do not make modifications - of course, you can override the hitTest method to listen to the hitTest processing before the event distribution.
Implement AppDelegate & UIWindowSceneDelegate
Next, we need to delete the original SwiftUI's App Protocol implementation, and implement our own UIApplicationDelegate and UIWindowSceneDelegate.
For UIApplicationDelegate, what we need to do is to allow our UIWindowSceneDelegate to handle the lifecycle of the Scene.

Here, we need to use @main to mark this as the entry point of the App.
When the App starts, it will call the application(_:configurationForConnecting:options:) method of the above code to get a UISceneConfiguration. Here we set the delegateClass to the AppSceneDelegate that we are about to implement. Of course, there is more than one way to make the App use a specific UIWindowSceneDelegate, you can set it in the Info.plist, please look up the specific method yourself.
Here's a little tip: If your App was created using the App Protocol of SwiftUI app, then you need to go to the place shown in the picture, and set it to not generate the Application Scene Manifest. This way, the application(_:configurationForConnecting:options:) method will be called.

Next, implement our UIWindowSceneDelegate, and create our own UIWindow instance within it, and load the SwiftUI View.

Some State and StateObject that were originally initialized in the App Protocol implementation, you need to move to do within ContentView. You can create a ContentView Wrapper, and initialize State and StateObject inside it. Alternatively, for these App states bound with the Scene, you can create them when creating the Scene, and then destroy them when the Scene is destroyed.
Handle Other Events
In SwiftUI, we can respond to changes in the activation status of a Scene by listening to @Environment(\\.scenePhase):
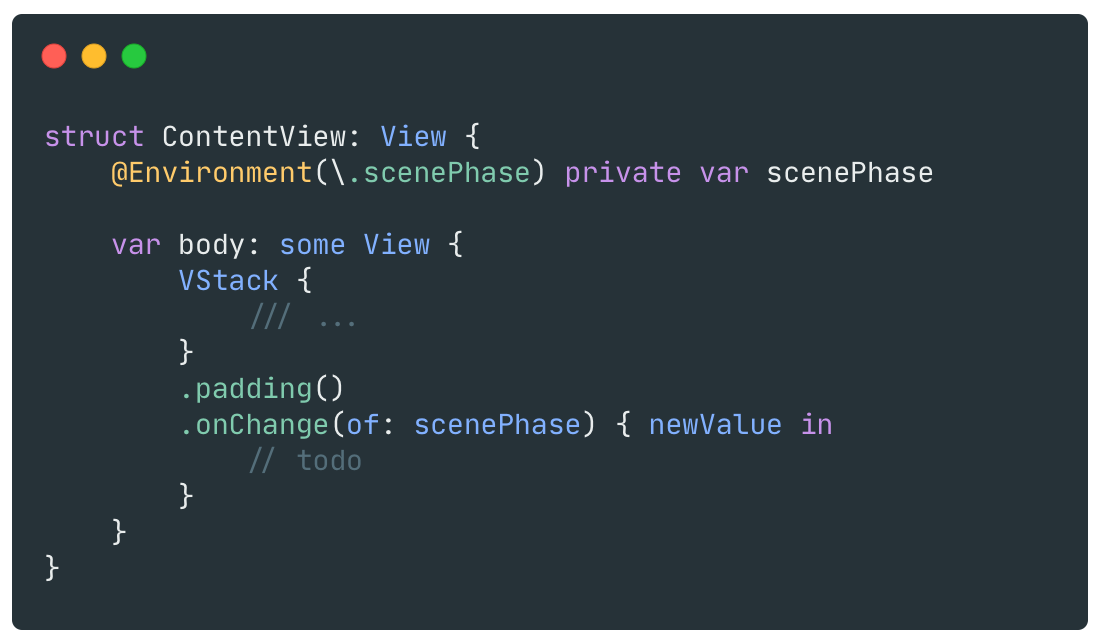
Because we implemented UIWindowSceneDelegate ourselves, we need to manually distribute and rewrite the scenePhase environment value so that the original View can correctly use @Environment(\\.scenePhase) to receive changes in the Scene lifecycle.
First, define an ObservableObject for publishing information:

Back to our implementation of UIWindowSceneDelegate:
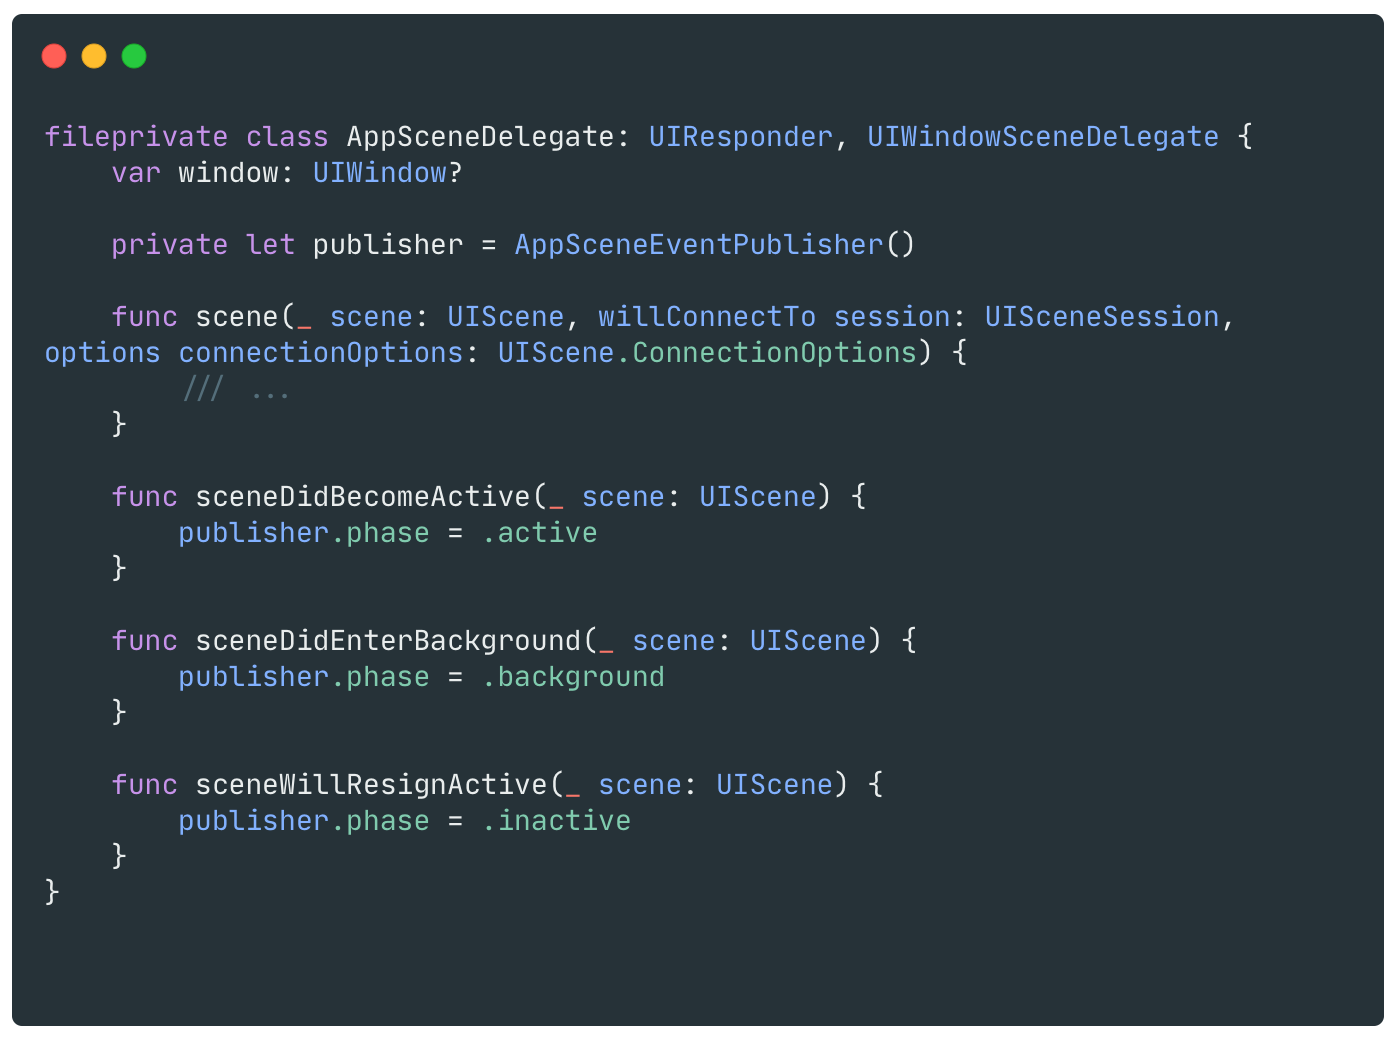
In places like sceneDidBecomeActive, set the phase attribute of AppScenePhase respectively. Now you can inject this AppScenePhase into the environment .environmentObject(scenePhase) where you create your SwiftUI View, and then get this EnvironmentObject in the sub View. Of course, in order to allow the sub View to continue to use @Environment(\.scenePhase) to receive changes in the Scene lifecycle, we need to override the value of this environment variable.

Similarly, we need to handle URL distribution in scene(_:openURLContexts:).

Implement your own CustomOpenURL ViewModifier:

Up to this point, the implementation of this solution has been completed.
There is no need for special handling where Menu and Picker are used, as it can correctly handle the touch response issue when the DropDown menu is expanded.
Afterword
If you have been following my previous articles, in order to implement a MenuBar only app and maintain backward compatibility to macOS 12.0 (which means not using macOS 13.0's MenuBarExtra), I have abandoned the App Protocol for the Mac platform. Instead, I manage the NSWindow myself to implement window management and display the SwiftUI View inside.
After solving the bug mentioned in this article, my Photon AI Translator has now completely abandoned the App Protocol - which is really a pity. The original app launch methods of UIKit and AppKit are still a bit complicated (of course, this refers to the case when the Storyboard is abandoned). The App Protocol method of SwiftUI is very elegant, but only when there are no serious bugs.
I have been writing SwiftUI apps for more than a year, and while writing this article, I once again sigh: I really hope that one day Apple can properly fix these small but user experience impacting bugs (there are also pitfalls about Sheet, the article is still being written, but some details are still being figured out), and let these fixes be backward compatible to older systems. Otherwise, when developing with SwiftUI, you still can't get rid of the understanding and intrusion of UIKit and AppKit.